I wrapped up the first chunk of my Crimson Fists, so I wanted to get them into the lightbox.
They’re weirdly very frustrating. The recipe is extremely simple and speedy; I’m painting them in what I would describe as the Citadel/Duncan style, which is to say I put down a bunch of base colors, wash it, tidy up the colors, and highlight.
Step 1: Base
GW Night Lords Blue basecoat on pretty much everything
VMC Dark Grey on flex, tubes
GW Leadbelcher on emblems, bolter parts
VMC Black on bolter case, grenades
GW Night Lords Blue to cleanup edges
Step 2: Wash
GW Nuln Oil
Step 3: Clean up
GW Night Lords Blue on large surfaces
VMC Dark Grey on flex, tubes
Step 4: Highlight
GW Thunderhawk Blue edge highlight on armor
Stop halfway through to do eyes:
P3 Inferno Orange
GW Gryph-Hound Orange
P3 Heartfire
GW Fenris Grey edge highlight over Thunderhawk Blue (on characters)
VMC Light Grey edge highlight on flex, tubes
Step 5: Cleanup (again)
GW Night Lords Blue to de-chunk the Thunderhawk Blue highlights
Step 6: Fist, Seals, Holsters
Pretty much the same as above but with GW Mephiston Red & GW Wild Rider Red, GW Zandri Dust & GW Ushabti Bone, and GW Mournfang Brown and GW XV-88 with GW Agrax Earthshade in the middle there.
Probably because it’s got like 12 steps that involve me applying Night Lords Blue it starts to feel old pretty quickly. Fortunately, I’m using NLB Air.
Here’s the thing, because I don’t know that I’ve advocated enough for the GW Air paints here: brush that stuff on. It’s fine in the airbrush (despite being in a damned pot and not a dropper), but their air paints tend to have great coverage w/r flow when just brushed on. When highlighting stuff, I would very much prefer their air paints over their non-air paints. The flow of the NLB, compared to the weird flow of the TB, makes it a lot easier for me to just not fight the Thunderhawk and then clean it up with the Night Lords.
Anyway, it’s so easy I expect progress to be faster than it is, which discourages me, which makes progress slower, etc. Vicious cirle.
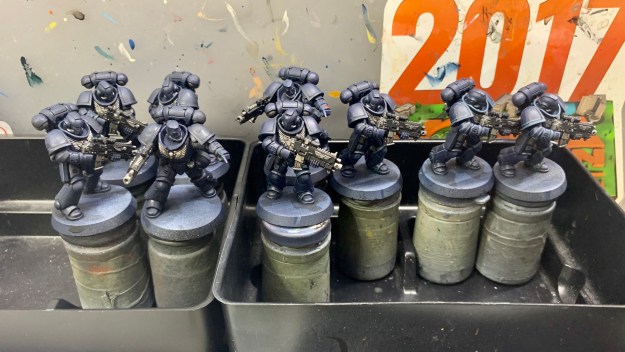
First batch is done, anyway. These are Intercessors and characters from Dark Imperium & Know No Fear and the Phobos LT from the SC! Vanguard box.
Intercessor Squad V 1Intercessor Squad VI 1Intercessor Squad V 2CharactersGravis CaptainPrimaris LieutenantsPhobos Lieutenant, Primaris Ancient
I’m also particularly pleased with how the power swords came out.
I feel like I need to defend the decision to paint these guys. I don’t know that I can, besides noting that I’d bought them before the police violence had gotten out of control, they’re fundamentally just another gang, and I just like felt like painting them.
I’m loving the blue here. I love the blue so much I’ve decided to paint up a bunch of Crimson Fists because I need to live in it some more.
I got a weird bug up my butt about painting up some Skaven to use for Saga: Age of Magic, so that’s a thing I did.
I painted them up in the same style as Spiteclaw’s Swarm, which was different from the way I’d painted up my WHFB Skaven back when. I think it’s kind of a neat scheme: kind of the same except paler and cooler.
I decided to challenge myself by not buying any models for this project: everything came out of the Skaven reserves drawer in my hobby closest. This limited my options: if I’d had 1 more Stormvermin Halberd, for example, I’d have been able to do 3 points’ of Hearthguard and not 2. I didn’t spend a single dollar on this project.
I did lose enthusiasm for it about halfway through. There are some options I’m missing: these guys will be Lords of the Underworld, so I could use a few Destruction Teams, at least one unit of Levies, another Monster, and some ranged weapon Warriors, but I don’t feel like it, don’t have the models, don’t feel like it, don’t have the models/bits (respectively).
All in all, I spent about 3 weeks on this; I’m glad to have it done.
My primary coping mechanism during this pandemic has been to plan for all the gaming I’m going to get to do if it ever blows over. One of my current plans is try my hand at a Necromunda campaign in my basement.
I’ve got Sector Mechanicus covered with the Deadzone terrain (which I’ve expanded on since that post during the halcyon days of 2014), but the table in my gaming room (constructed in November and un-posted about here; I should fix that) is 6’x4′, which doesn’t leave enough room for 2 4’x4′ tables (I’d have loved to have made it larger, but this is as big as the space permits). That’s a problem if I want to have 2 games/time.
I got the Underhive box when it came out, so I’ve got Zone Mortalis tiles, which solve the problem. I’ve got room for 2’x4′ worth of tiles; more if I shrink the Deadzone table down to a 3’x4′ or so. The tiles have walls marked on them, and the thing to do is to build some MDF or print off some walls to make them feel more real. Cool.
I did some waffling between the offerings from Warlayer and Corvus Games Terrain. I’m not interested in printing off new tiles, just walls, so the Warlayer set was the obvious choice. That was dumb. I should have considered Dragon’s Rest, which costs more but I think is a lot better looking and, while $19 is 4x as much as Warlayer’s $5, it’s hardly crippling. Didn’t think of it until I was 80% towards being done printing off the Warlayer, though, so I’d gone too far to change it up.
In working with these STLs, though, I’ve run into a couple of things that I figured I’d talk through. It’s fine: I spent $5 on them, that they require a little work isn’t the end of the world, and ultimately they’ll work out OK.
First off, after printing off about 1-2 of each piece, I decided only cared about the 2-square walls, 1-square walls, and the 4-way intersections. Those three shapes cover every variation on the tiles. The 3-way and 2-way intersections don’t fill the negative space on the tiles the way I’d like.
Secondly, they’re the wrong size. Ugh.
Look at these two pieces below: the one on the left is the default size: note that it hews perfectly to the squares… except the board has other spaces between the squares, which means the default size doesn’t actually fit the grid worth a damn. The one on the right is resized: I literally measured the size of the tile, divided it by 6, and resized the pieces around that.
The tiles are 289mm square, 6×6 square. That means each real square is actually 48.16mm square, not the 43.20mm it first appears. That adds up to a pretty substantial difference as you line these pieces across the tile.
So, I uploaded them to TinkerCAD and resized them. I probably could have done this in the slicer but I wanted to be able to make sure I knew what I was doing and that things lined up and such. In addition to lengthening all the pieces, I also had to widen them because those quad-intersection pieces were resized along both axes.
I also counted up how many of each were needed to cover each tile. Conveniently, the tiles are basically the same on both sides. I’m planning on using the walls and barricades that were included in Underhive, so I didn’t include printed replacements for them in my count. Were I to do so: +4x 2 square walls, +1x door, +2x figure something out for the 1 square-sized doors. I’m doing a few of the open window variants, because they’re there, and a few doors because why not. 6/26: I guess all of things I thought were plastic walls are actually supposed to be doors. That makes it easier. Still no good solution for the 1 square wide doors; I could muddle through something but it’d definitely be more work than I’m willing to put in.
6/26: I also realized I was very dissatisfied with how the duct tiles worked with the printed terrain. That was something easily fixed: I threw an 18-ish mm octagon across a 1 square wall. Took a little fiddling to get it looking right.
Shape
Original LxW
Resized LxW
# Needed
2 square Wall
88.19mm x 35.27mm
96.33mm x 39.35mm
12
1 square Wall
43.12mm x 35.27mm
48.16mm x 39.35mm
23
duct wall
48.16mm x 39.35mm
5
4-way Intersection
43.20mm x 43.20mm
48.16mm x 48.16mm
26
Door
76.26mm x 13.33mm
83.30mm x 14.87mm
5
Table of shapes, original sizes, resized sizes, and quantity needed.
At these sizes, they fit perfectly.
Let me tell you how I screwed up magnetization.
These pieces come with 4 magnet holes 3mm across, 2mm deep at every connection point. The resizing did distort these by a smidge: they’re maybe 9% larger in one dimension? So, maybe a 3mm x 3.27mm oval and not an even 3mm circle, but I don’t think it’s noticeable.
I magnetized them, basically with a polarity: each piece goes one way. That way, I never end up with a piece that has positives facing out or negatives facing out. I can always line them up in a row.
For the intersections, I did the same thing:
I got about halfway through when I realized: this will work but it’s definitely not the smart way to do it. A better way would to have done the left side of each contact with one polarity and the right side with a different polarity.
This would mean that, instead of every piece having a correct contact direction, every contact direction would work. I was way too far along in the process before I realized this, though, so I’m pretty stuck.
I’m almost done printing these out.
I’ll probably do a very quick paintjob on them: I don’t think they’ll look great but they’ll look alright. This was a test piece done in a few minutes: primed white, Vallejo Air Hull Red, Vallejo Air Orange, GW Leadbelcher sponged on. I’ve got some red filler primer that’s pretty close to that Hull Red color, so I need to experiment a bit more with that before I do everything.
Current project is a Skaven force for Saga: Age of Magic. I’ve been pretty down on Saga since mid-1E, but I figure most of these quarantine projects are for games I’m never going to play.
I’m calling this my $0 Skaven, because I have an immense reserve of Skaven models in my hobby closet, and all of these are models I’ve pulled from it. I haven’t spent a $1 on this project (that wasn’t spent back before WHFB was unceremoniously murdered).
I’m 2.5/8 points painted and I have to cop to being kind of burnt out on this project already: I bit off more than I could chew with the first batch, which was 12 Clanrats and 2 Rat Ogres. My current batch is 8 Clanrats and 2 Rat Ogres, which has been more digestible… but still probably too much.
These were kind of an impulse project: something to work on while locked down. The likelihood that I’ll ever actually play Age of Sigmar is pretty low but hey: now I can. I expect that’ll be the theme for my time in isolation.
A little as I feel drawn to play Games Workshop games, it truly is a delight to paint their models. Corvus Belli makes some gorgeous models, too, but I don’t get quite the same joy from painting Infinity models as I do GW models.
It’s Week 13 for me, a full 88 days in, but Time is a flat circle so even though I took this photo a few weeks back, I’m just getting around to posting it now.
These are the fruits of the first 10 weeks of isolation:
5 Adeptus Titanicus models
1x Reaver
2x Acastus Knights Porphyrion
2x Cerastus Knights
10 Adeptus Titanicus weapons
2x Warlord Macro Gatling cannons
2x Warlord Paired Vulcan Megabolters
2x Warlord Quake Cannons
2x Reaver Carapace Vulcan Megabolters
2x Reaver Warp Missiles
Also some of the AT game aids
5 Malifaux models
Bayou Engineering
5 Infinity models
5 Rodoks
63 Age of Sigmar models
24x Bull Ogres
24x Gryph-hounds (to proxy as Sabretusks)
6x Leadbelchers
2x Ironblasters
4x Ironguts
1x Mawpot
1x Tyrant
1x Hunter
Having my planned Infinity travel tournaments canceled (Rumble, Ruckus) has evaporated my enthusiasm for painting Infinity. I’d just finished painting up a bunch of Combined Army, but haven’t really gotten the chance to use them.
Learning that GW was closing down their warehouse prompted me to, frankly, panic-buy an Age of Sigmar army to work on fearing I’d have, uh, time enough at last to paint a bunch of stuff but nothing to paint. They lasted me an even 8 weeks.
My family needs to take COVID-19 seriously, so I don’t expect to play any of these games until Autumn at the earliest. In the meantime, I’m probably going to continue painting like a maniac because it gives me something to do and to focus on.